Friday, September 30, 2016

Jack the Guinea Pig, 1790


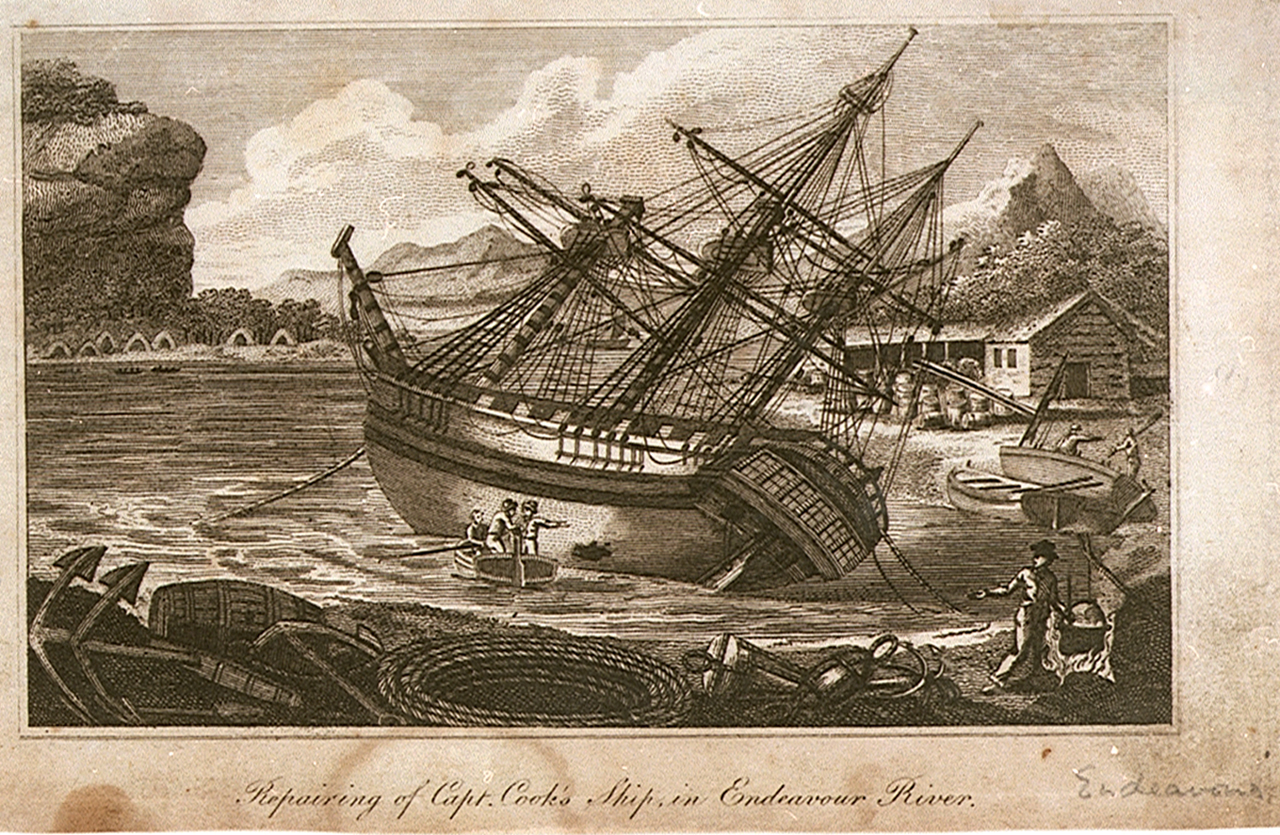
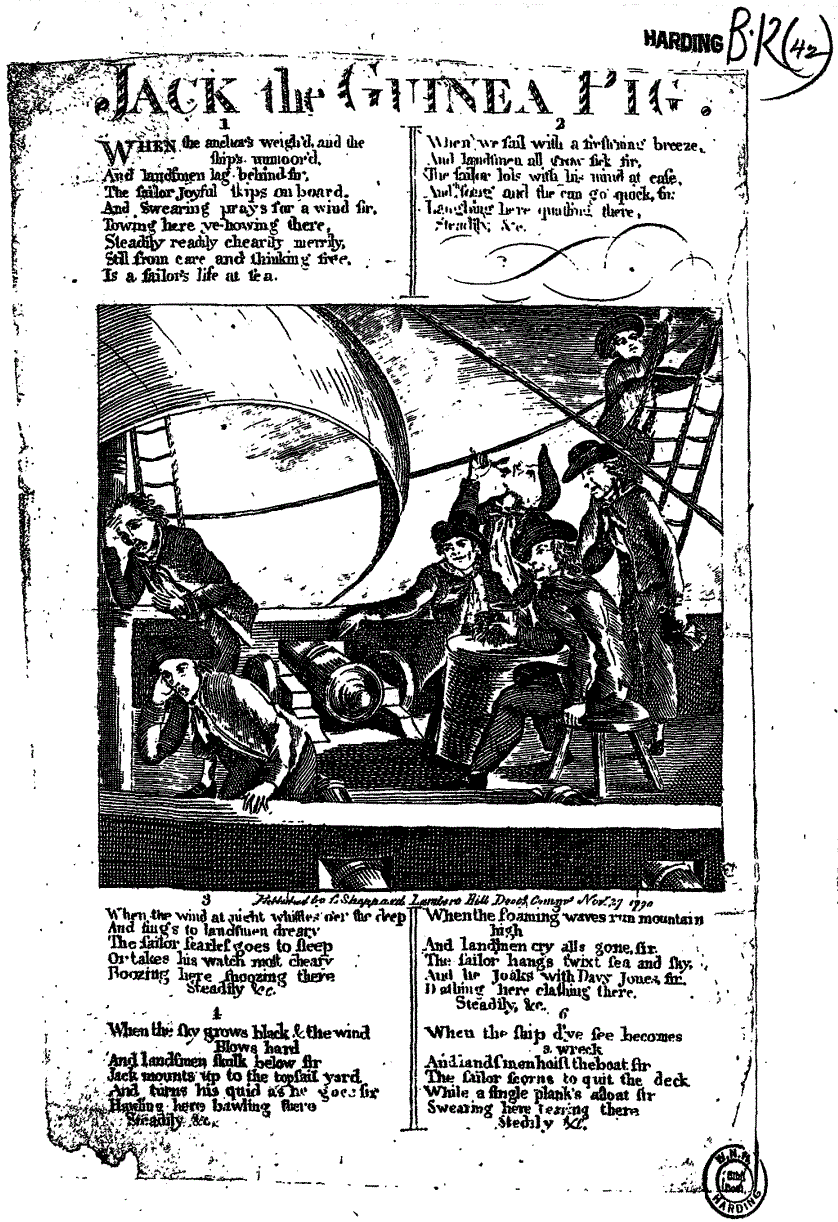
"Jack the Guinea Pig," C. Sheppard, 1790, Bodleian Ballads Online.

The author of "Jack the Guinea Pig" wrote a cheerful and peppy ballad of the joys of life at sea, and how hardened sailors can revel in their difficulties. To accompany this piece, the prolific engraver C. Sheppard illustrated a party of tars drinking atop a rum or water cask, taking delight in the suffering of the nearby landsmen. As the ballad writer put it:
When we sail with a freshening breeze,
And landsmen all grow sick, sir,
The sailor lolls with his mind at ease,
And the song and the can go quick, sir.
Laughing here,
Quaffing there,
Steadily, readily,
Cheerily, merrily,
Still from care and thinking free, Is a sailor's life at sea.
Sure enough, these landsmen are having a miserable time.


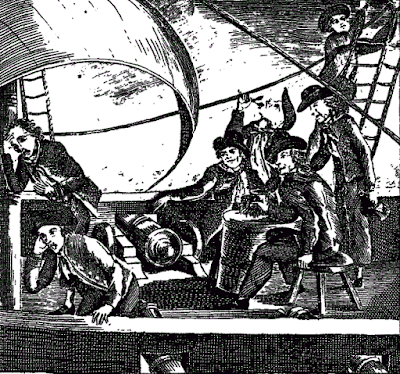
The two landsmen in the left of the frame are without waistcoats. One wears a cocked hat, the other is hatless. The fellow in the background wears an unremarkable jacket and trousers that end at about the bottom of the calf with white stockings and shoes. His mate in the foreground wears a single breasted jacket with white buttons (possibly metal) and turned back cuffs with dark breeches or trousers.

To the right is a party of sailors on deck. Those that we can see have trousers. The sitting tars has close fitting trousers that show off his calves and a jacket with a single vent at the back and closed, scalloped mariner's cuffs. Though difficult to be certain, I think he is wearing a neckcloth around his neck. Certainly the other three wear neckcloths, but at least two of them are without waistcoats. All of them wear jackets and round hats with wider brims. Interestingly enough, the crowns of their round hats are both rounded and conical, showing a wider variety in round hat headgear than I've seen in any other single image.

Climbing aloft on the ratlines is a sailor on watch, wearing the same as his mates: a round hat, jacket, shirt without waistcoat, and dark trousers.

Wednesday, September 28, 2016

Repairing of Capt Cook's Ship in Endeavour River, 1770?


"Repairing of Capt Cook's Ship in Endeavour River," artist unknown, date unknown, National Maritime Museum.

The famous barque Endeavour was the trusty vessel that Captain James Cook commanded on his exploration expedition of 1769-1771. Captain Cook and his men faced numerous perils on their journey, and in this particular scene the Endeavour is being repaired after striking a reef off of Australia. Beside the shore where she was run up and repaired runs a river that now bears her name. This is the second time I have visited this storied shore.

Unfortunately, this piece is low resolution, and doesn't yield much, but there is still something to e said of the sailors in it.


At a pair of boats in the background, two sailors maneuver spars or oars. One, standing or sitting in the boat, wears a jockey style barge cap and jacket, with what appears to be the neckcloth hanging over his back. His mate wears a pair of trousers and a jacket.

In the foreground, a sailor cooks over a large cauldron while wearing a round hat, single breasted jacket, and plain trousers.


Inspecting the damage is a standing tar who wears a round hat, single breasted jacket, and what might be petticoat trousers or trousers. The cox wears the same, except he may be wearing breeches. And the oarsman is bare headed.

Saturday, September 10, 2016

Penn's Treaty with the Indians, 1771-1772


Penn's Treaty with the Indians, Benjamin West, 1771-1772, Pennsylvania Academy of Fine Art via With Art Philadelphia.

Benjamin West was a Pennsylvania born artist who specialized in historical scenes. He is perhaps most famous for his "Death of General Wolfe," which I have featured here before.

West was a contemporary of General Wolfe, but not of William Penn. In this painting, West relates the famous treaty with the Lenape that was signed shortly after the establishment of the colony of Pennsylvania.

West illustrates the scene almost a century after it happened, but the clothing of both the Pennsylvania Quakers surrounding Penn and the sailors that carry their trade goods are apparently unchanged from West's own time.

This is not the first time an artist of the eighteenth century depicted sailors of the seventeenth in anachronistic clothing. Today's popular culture often depicts sailors as either pirates or whalers, with an implied idea that those sailors were wearing basically the same slop clothes throughout the centuries with little change. The concept of the rigidly unchanging tar's slop clothes appears to have existed in the past as well.

Though this painting depicts a scene from the seventeenth century, it depicts sailors in the clothing of the time it was painted, and so I will be tagging it and including it in my examination of common sailor's clothing of the mid to late eighteenth century.


At the center of the piece and kneeling beside Penn, a pair of sailors offer trade goods to Tamanend, a chief of the Turtle Clan of the Lenape.

The sailor in the background wears remarkably close cut hair, a white collared shirt, and a purple neckcloth with white spots. He also sports a blue jacket.

His mate wears a green waistcoat with a yellow neckcloth and white shirt. His plain petticoat trousers run down to below the knee, and a bright red cloth garter snakes out from beneath the hem. Our sailor's stockings are dark blue, and his shoes are black or brown.


In his compositional study for this painting, Benjamin West original depicted the sailor at center with a longer waistcoat, but shortened it in the final piece. Shortening the waistcoat serves to make it more appropriate to the fashions of the 1770's. This small detail supports the theory that they are depicted in clothes that are more contemporary with West than intended as strictly historical.


The first thing that should be addressed is whether these men are sailors at all. Short hair, petticoat trousers, and jackets with mariner's cuffs could certainly suggest that they are. Back when I wrote the piece on West's "Death of General Wolfe," there was some objection that those figures were sailors, as their clothing had some overlap with rangers. These men, however, are clearly shown resting over crates with more being hauled up by their mates from the Delaware River. There can be little doubt that these are indeed sailors.

Here's where it gets interesting.

Sitting in the foreground is a sailor showing off something I have never seen before: bare knees and thighs beneath petticoat trousers. There are many, many examples of sailors wearing breeches beneath their petticoat trousers. For quite some time there has been debate on whether or not sailors went without breeches beneath their petticoat trousers, and this painting adds a bit of fuel to the fire.

Could it be that this is exceptional? His sleeves are rolled up well above the elbow, and he's taking a break from hauling heavy cargo. Could this be a nod to the historical setting, with West presuming a different fashion for sailors in the seventeenth century? If so, he would probably have made some other changes to their slop clothes. Maybe West was unfamiliar with how sailors dressed and presumed they went without breeches? As a transatlantic traveler and resident of the two largest port cities in the British empire (London and Philadelphia), it seems unlikely that an artist with an eye as trained as West's would miss a basic fact about the physical appearance of sailors.

As this is the only image to depict sailors without breeches beneath their petticoat trousers, it would be unwise to draw any conclusions.

In any case, like his mates to the right, he wears blue stockings and red garters. His shoes are black with pointed toes and white metal buckles. Out of the slit pocket of our sailor's orange waistcoat with horizontal stripes with a blue handkerchief striped with white. Around his neck is a pink or purple neckcloth, matching that of the man immediately behind him.

This sailor wears a green jacket with buttoned downed mariner's cuffs and white metal buttons. He wears a white shirt, blue stockings, plain petticoat trousers, garters, and a neckcloth identical to his mate's.

The only other tar we can see clearly is hauling a crate over his left shoulder. His knees are bared as well, showing him without breeches either. Otherwise he wears a smock and dark blue stockings.

Thursday, September 8, 2016

Industry and Idleness Rewarded, c.1775


Industry and Idleness Rewarded, artist unknown, c.1775, Colonial Williamsburg.

This decorative handkerchief is a morality tale of two servants, William Goodchild and Jack Idle. These Goofus and Gallant characters follow very different paths. Goodchild becomes a high ranking political figure, while Idle is put to death.

A trope of sailors in fiction is their inherent immorality. This predates the eighteenth century, as in the novel Robinson Crusoe, wherein the title character often laments his sinful life, but says little about what he did wrong besides ignoring his father's advice and becoming a sailor.

Such is the case here. Jack Idle goes to sea in a scene reminiscent of William Hogarth's "The Idle Prentice Turn'd Away and Sent to Sea."


Jacke Idle is shown being rowed to sea, and is directed to observe the gallows over the sea, bearing a corpse as a warning to sailors. Beneath this frame is a Biblical verse surrounded in a wreath: "The wise shall inherit Substance, but shame shall be ye promotion of fools." This is an interesting translation of Proverbs 3:35, which is usually translated (and was at the time in the King James' Version of the Bible) as "The wise shall inherit glory" or "honor." This translation, and indeed the print as a whole, links wealth and political success to virtue. Bad fortune and destitution, meanwhile, are linked to vice.

Sailors then, as low class laborers, are inherently vicious.


Jack Idle, furthest aft, wears his own curly hair cut fairly short over a dark neckcloth and single breasted jacket. The sailor standing amidships wears a cocked hat bound in white taps, a bob wig or bob wig style of hair, a light neckcloth and short jacket with slit cuffs. His shirt may be striped and he is without waistcoat. Around his waist are a pair of petticoat trousers. The oarsman wears  a plain cocked hat, short hair, a dark neckcloth, and a single breasted striped jacket.


At the base of the handkerchief is a pair of illustrations showing the further rewards awaiting idleness and virtue. Ont he left is "Trade & Commerce," showing William Goodchild shaking hands with a Spaniard, while a Dutchman smokes his pipe. A bound crate bearing his initials is ashore, and more goods are being carried there.


Jack Idle, had he not been hanged, would certainly have been transported as a convict servant to Virginia or Maryland. His fate was to be equated with the enslaved shown hoeing tobacco plants.

Tuesday, September 6, 2016

Revolt of the Marlborough: Underestimating the Enslaved

This is the conclusion of the Revolt of the Marlborough, part of the Race, Revolt, and Piracy series. You can find parts one, two, three, and four by following the links provided.

The story of the Marlborough is one of mariners consistently underestimating the agency of their enslaved human cargo. Captain Robert Codd brought some of the men onto the quarterdeck behind the barricado to help sail the ship, Captain Thomas Jones was cocky enough to try boarding even when he held an advantageous position to disable the Marlborough by his great guns with little risk, and John Harris assumed that they must surely be lost to the sea after sailing away from the Hawk's defeat.

The newly enslaved were capable and skilled. They could sail, they could work muskets and cannon, and they could row. What the Marlborough reminds us is that despite their horrifying condition, the enslaved were also thinkers.

Of the thirty five crew members that sailed the Marlborough, the captain, mates, armed sentries, and surgeon were the subjects of the most violence. The ship's boys, cooper, sailmaker, two common sailors, and the boatswain were spared. Given the boatswain's position as disciplinarian of the crew, it is possible that the slaves viewed him as necessary for keeping the remaining white sailors in line, or that they saw him as the only one to lay a hand on white men during the voyage, earning some degree of respect. The cooper and sailmaker possessed skills that kept them off watch and therefore less likely to abuse the enslaved, which may have ensured their survival. The ship's boys offered little threat to the enslaved. When offering mercy to the sailors hiding in the tops, they even called to Harris by name.

Not numbered among the surviving crew by Harris is the cook. There are two mentions of the cook in Harris' account: when the Africans retrieve his mall to beat the wounded and dying surgeon to death, and when the cook convinces the enslaved to let Harris lead the boat ashore. It is possible that the cook was of African descent himself, otherwise it is difficult to see how he would have had any sway. In any case, he too was spared. And Harris' omission in his account of the very man who saved his life is notable.[1]  

Those the formerly enslaved chose to spare demonstrate their understanding of shipboard hierarchy. Not only did they understand which crew members were most responsible for their suffering, but they also knew which were useful for their survival.

At that, the Africans were reversing the seemingly immutable formula of the slave trade: a relatively few European sailors would restrain a great number of Africans and choose who would live and who would be put to death. Now a great number of Africans would restrain a few Europeans. These sailors might be spared, they might be thrown overboard for the sharks, or they might be killed outright.

All of this illustrates what is well known to students of the Middle Passage: enslaved Africans were not obedient cattle to be herded into slave ships and resigned to their fate. They were skilled, they were smart, and they resisted.

---
[1]  John Harris, letter to his father, London Evening Post, April 5, 1753, page 4.

Sunday, September 4, 2016

Revolt of the Marlborough: Battle at Sea

This is the fourth part of The Revolt of the Marlborough. Follow these links to Part 1, Part 2, and Part 3.

The Bonny Africans, formerly enslaved by the Europeans, had been put ashore, as had John Harris and possibly the rest of the ship's boys. Behind them death permeated the Marlborough, where most of her European crew was killed, and certainly a significant number of Africans. Bullet scars marked the tops, where the former slaves had kept up a heavy fire for hours on the first day of the revolt.

Captain Thomas Jones had just steered the Hawk to the Bonny coast, and it was immediately evident that something was not right on the Marlborough.[1] Captain Jones was on his second voyage as commander of the Hawk, which was making her fourth voyage to Africa.[2] He'd had enough time at sea to know how other vessels ought to look, and in particular how a fellow Bristol slaver should appear. Jones ordered his men to sail to the Marlborough.

Captain Jones may have had the well being of the European crew in mind, but there was a further motivation to retake the Marlborough. If she could be retaken, he and his crew could be rewarded with salvage rights. It was, after all, legally cargo that had risen up and taken the ship. He could take possession of those slaves and the ship, selling them to double his profits for the voyage.

John Harris was safe ashore for the fight, but related the events after the fact. Jones steered the Hawk under Marlborough's stern, the point of the ship most vulnerable to cannon fire. When sizing up the ships, the scales were tipped in favor of the Hawk. She mounted two more guns than the Marlborough, and came in somewhat heavier than her potential opponent.[3]

Hailing the Marlborough, the Hawk was told the captain and much of the crew were ashore, and that she was filled with a sick crew. Jones didn't believe the lie, and sent over a yawl to investigate. When his sailors could clearly see that the Gold Coast Africans had taken possession of the ship, the Hawk leapt into action.

Detail from "The Engagement between The Arethusa and La Belle Poule, 17 June 1778," 
Francis Swaine, c.1778-82, Royal Collection Trust.

Jones could have laid on their stern and pumped the Marlborough full of shot until the Africans aboard surrendered, but such a strategy would have doubtless killed many of them, damaged the ship, and further reduced his profit. Not to mention the likelihood of killing Europeans in the mix. Instead, he opted to board her in the night.[4]

As later related in newspapers across the British empire, "the Negroes were so expert at the Great Guns and Small Arms, that they soon repelled them."[5] The Hawk, despite having superior guns, was outmatched by the perhaps 150 former slaves who were fighting not for profit but for their very lives. At that, many enslaved men were taken in wars, and as such would have been trained soldiers with experience in handling small arms. Jones severely underestimated his prey.

The next morning the Marlborough's boatswain leapt over the side and swam to the Hawk, just before the Gold Coast Africans cut their cable and raised sail, leaving behind the humiliated Hawk and the now free Bonny Africans. Months later, the Gentleman's Magazine would commemorate the victory of the former slaves, relating that after the battle they "boldly put to sea, in order to regain their own country. How sweet is liberty!"[6]

This is the last sighting that Europeans had of the Marlborough, though Harris supposed them lost. It was inconceivable to him that they might attain their goal and regain their freedom. Unfortunately, we don't know whether they ever made it back to their homes, or if they were "lost or drove to Sea," as Harris thought.[7]

Next time: some final thoughts on the Marlborough.

---
[1] John Harris, letter to his father, The London Evening Post, April 5, 1753, page 4.
[2] Slave Voyages Database, accessed July 3, 2016.
[3] Bristol, Africa, and the Eighteenth Century Slave Trade to America, Volume 3: The Years of Decline, ed. Joseph Bettey, Britol Records Society: 1991, pages 49, 70.
[4] Harris, London Evening Post.
[5] The Maryland Gazette, May 10, 1753, page 2.
[6] Gentleman's Magazine, February 1, 1753.
[7] Harris, London Evening Post.

Friday, September 2, 2016

Revolt of the Marlborough: Return to Africa

This is a continuation of the Revolt of the Marlborough. Follow the links to find Part 1 and Part 2.

High aloft Captain Robert Codd hid in the fore top, over the bloodied deck where the few surviving crewmen of the Marlborough and hundreds of armed former slaves gathered. Codd could do nothing but helplessly watch as his sailors were put to work turning the Marlborough about and heading for the unseen shore.

Two tense days passed in peace while the Marlborough plowed toward the African coast.

"A Liverpool Slave Ship," William Jackson, 18th century,
Merseyside Maritime Museum.

Two days without food or water must have taken their toll on Captain Codd. His crew must have known they were close to the African shore. If they could hide him closer to the deck, where they might give him sustenance and care for any wounds he may have sustained, there was the chance he could survive. Convincing the former slaves that they needed to tend to the sails on the foremast, the sailors climbed aloft and remarkably rescued the captain from the top, hiding him in the forestay.

According to Harris' account, the very next morning the African coast rose on the horizon. That same morning, the former slaves also spotted Captain Codd's coat skirt peeking out of the sail in which he was hidden. Codd's punishment for killing hundreds and enslaving thousands was a swift one. "They...went to him, cut his belly open, and toss'd him over-board."

With the highest symbol of European oppression gone over the side, the Africans turned to reaching shore and their freedom.

Detail from "A Launch of Spaniards weighing an Anchor at Teneriff,"
Gabriel Bray, 1775, National Maritime Museum.

Though some distance from a windward shore, the "Gold Coast slaves" ordered the boats loaded so they could make for the coast. While Harris was dismissive of the idea of making the run in the small yawl and long boat, the coast was home to a number of slavers, and if those ships found the Africans in possession of the Marlborough, they would surely try to take it back, claiming the ship and her human cargo as salvage. Small boats might slip by undetected, or could be passed off as the legitimate possessions of the Africans.

Loading up the boats "as deep with Goods and small Slaves as she could swim," the Gold Coast Africans prepared to put in to shore. Now, seemingly safe from European intervention, the old cultural divisions came to the surface. The Bonny Africans refused to remain on the Marlborough, perhaps fearing the boats would not come back for them once ashore. When the Gold Coast Africans tried to prevent them from getting into the boats, a panic broke out, and the boats were sunk under the weight of panicked people.

Harris later stated that the Gold Coast Africans refused to let the drowning Bonny Africans back onto the boat, "which drown'd upwards of an hundred of them." Even allowing for the likely exaggeration, there was clearly a significant loss of life. Anger boiled over, and the two factions ignored their common goal to fight. Harris records that they fought all through that night, stopping only in the morning to eat before fighting again.

Somehow, peace was regained. The two sides clearly despised each other, but it must have been obvious that unless they worked together, none of them would return home. Once the fighting had stopped, the Marlborough was brought in close to shore. Though made nervous by the sight of gathered slave ships, the Africans decided to risk going ashore.

The punt, possibly the only surviving boat of the Marlborough, was put to work ferrying the Bonny Africans ashore. It is possible that this was part of a truce between the factions: the Bonny Africans would be put ashore as soon as possible to assuage their fears and allow for the Gold Coast Africans to make sail for their own home without any further, fruitless conflict. After some debate, Harris was loaded into the punt to help guide it to shore.[1]

Harris makes no mention of a daring escape, or that the Africans on the Marlborough expected him to return. It may be that as a white man, Harris was a tool used to cover the movement of former slaves under a veil of legitimacy right under the spyglasses of gathered slave ships, and then released. About eight sailors were kept aboard the Marlborough, likely to guide it to the Gold Coast.[2]

For a few days the Marlborough lay at anchor within sight of the slavers, though it is unclear why. The remaining Gold Coast Africans had command of the Marlborough now, and were about to face their next great challenge.

Next time: A sea battle between slavers and the Africans of the Marlborough.

---
[1] John Harris, letter to his father, London Evening Post, April 5, 1753, page 4.
[2] John Harris, letter to his father, Felix Farley’s Bristol Journal, March 24-31, 1753.